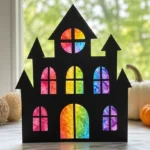
Description
Create vibrant Halloween decorations with this fun and engaging crayon melting project for kids.
Materials
- Assorted crayon shavings (preferably in vibrant colors)
- Wax paper
- An iron (with supervision for younger children)
- Scissors
- A template of a haunted house
- Clear tape or a glue stick
Instructions
- Prepare the Template: Start by printing out or drawing a haunted house outline on a piece of paper.
- Create Crayon Shavings: Use a sharpener to create crayon shavings in various colors.
- Layer the Wax Paper: Cut two pieces of wax paper slightly larger than your haunted house template.
- Add the Crayon Shavings: Spread a thin layer of crayon shavings across the center of the wax paper.
- Cover with the Second Layer: Place the second piece of wax paper on top of the shavings.
- Melt the Crayons: With adult supervision, gently press an iron on a low setting over the top layer of wax paper.
- Trim the Design: Once cooled, carefully trim around the haunted house outline.
- Display Your Art: Use clear tape or a glue stick to adhere your colorful facade to the window.
Notes
Always supervise children during the ironing step to ensure safety.