

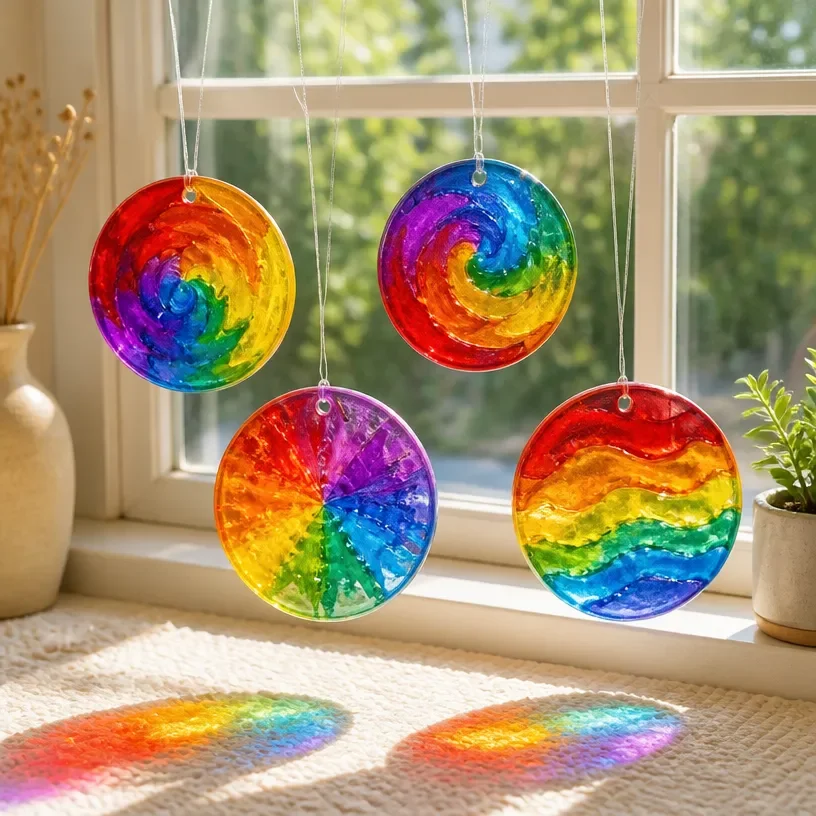
Rainbow-Colored Glue Suncatchers: DIY Window Art for Kids
Creating beautiful rainbow-colored glue suncatchers is a delightful art project that kids will enjoy. Not only do these artsy creations brighten up any window, but they also give children the chance to express their creativity using simple materials. This project is perfect for a sunny day, as the sunlight will shine through each colored suncatcher, creating a stunning display of colors that dances across the room. You may also find Bubble Dough Sensory Play Diy Activity For Kids useful.
To get started, let’s explore why you and your kids will love making these suncatchers. You may also find Diy Bubble Printed Butterfly Wings Craft For Kids useful.
Why You’ll Enjoy This Project
Easy and Fun: This project is straightforward, making it excellent for young artists and beginners. Kids will love mixing colors and watching their suncatchers come to life. You may also find Diy Halloween Boo Basket For Kids useful.
Promotes Creativity: Kids can experiment with different colors and patterns, allowing them to express their unique style.
Great for Learning: As they create, children can learn about colors, shapes, and even concepts like light and shadows.
Budget-Friendly: You can make these suncatchers with inexpensive materials that you likely already have around your house.
Perfect for Any Season: Whether you’re looking to add some cheer in winter or celebrate colors in spring, these suncatchers are always relevant.

Materials You’ll Need
- Glue: Clear school glue works best.
- Food Coloring: Various colors to make vibrant suncatchers.
- Wax Paper: A clean surface for creating the suncatchers.
- Paintbrush or Squeegee: For spreading glue easily.
- Scissors: To cut the wax paper once dry.
- Tape: To secure the wax paper as needed.
It’s important to note that you can also substitute the wax paper with clear plastic or even consider options like making cornstarch suncatchers for a different texture and look.

How to Make Rainbow-Colored Glue Suncatchers: DIY Window Art for Kids
Prepare Your Workspace: Lay out wax paper flat on a table. You want a clean surface to work on.
Mix Glue and Color: In small bowls, mix your glue with food coloring to create various colors. Start with a few drops of color more can be added for vibrant results.
Create Patterns: Using a brush or squeegee, apply the colored glue onto the wax paper in whatever designs or shapes you like. Encourage kids to get creative with swirls, lines, or even shapes.
Let Dry: Allow the glue to dry completely. Depending on the thickness, it may take several hours or more. It’s ready when it has a firm, plastic-like feel.
Cut Out Shapes: Once dry, use scissors to cut around the designs in fun shapes. You can even create simple shapes like hearts or stars.
Attach to Windows: Simply peel the suncatcher off the wax paper and stick it to the window where the sun can shine through!
Helpful Tips
Layering Colors: Layer colors for a marbled effect. Let one color dry slightly before adding another on top.
Cleaning Up: Keep wet glue off hands and tables by using old newspaper as a protective layer for easy cleanup.
Viewing: Place the suncatchers in well-lit areas to maximize their visual impact.
Storage: If you want to preserve them for later, store your suncatchers flat between sheets of wax paper.
Easy Variations
Seasonal Themes: Use holiday-themed colors like orange and black for Halloween or red and green for Christmas.
Texture: Experiment by mixing in sand or salt with the glue for a textured effect, similar to a 3D salt painting.
Different Shapes: Instead of the classic suncatcher, make shape cutouts like animals or flowers.
Making This Craft With Kids
This project is perfect for kids of all ages, but younger children may require extra supervision especially when using scissors. Encourage them to help mix colors and spread the glue, which is safe and allows for creative freedom.
How to Display or Use It
Once your suncatchers are made, stick them in windows that receive direct sunlight. They can also be lovely gifts for family, especially for holidays or special occasions! Another option is to hang them in indoor spaces where they can catch ambient light throughout the day.

Frequently Asked Questions
1. How long does it take for the glue to dry?
Drying can take several hours to a whole day, depending on how thick the glue is applied.
2. Can I use other types of glue?
Clear school glue works best, but you can also try liquid gel glue or white craft glue.
3. What if my suncatcher curls up?
Try to place a heavier object on it while it dries to help keep it flat.
4. Can we use glitter?
Yes! Adding glitter to the glue mixture can give extra sparkle to your suncatchers.
Conclusion
Crafting rainbow-colored glue suncatchers can be a delightful experience for you and your kids. Not only does it foster creativity, but it also enhances your home decor in a vivid way. If you are looking for more inspiration, consider a project like a rainbow suncatcher made with just the primary colors, or explore supplies like BENECREAT’s butterfly stained glass paper available on Amazon for unique crafting ideas.
Print
Rainbow-Colored Glue Suncatchers: DIY Window Art for Kids
- Total Time: 495 minutes
- Makes: 4 suncatchers
Description
Create beautiful rainbow-colored glue suncatchers with kids using simple materials. Perfect for sunny days and promoting creativity!
Materials
- Clear school glue
- Food coloring
- Wax paper
- Paintbrush or squeegee
- Scissors
- Tape
Instructions
- Prepare your workspace: Lay out wax paper flat on a table.
- Mix glue with food coloring in small bowls.
- Create patterns using the brush or squeegee on the wax paper.
- Let the glue dry completely until it feels firm.
- Cut out shapes once dry.
- Attach the suncatcher to a window for sunlight to shine through!
Notes
Consider using clear plastic instead of wax paper for different textures. Adding glitter can enhance the sparkle of your suncatchers.