Description
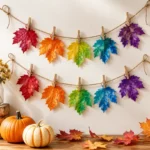
Create a stunning DIY melted crayon garland that captures the vibrant colors of fall, perfect for seasonal decor.
Materials
- Crayons (autumn colors preferred, like red, orange, yellow, and brown)
- Wax paper or parchment paper
- Iron
- Scissors
- String or twine
- Craft glue (optional)
- Leaf templates (or freehand shapes)
Instructions
- Prepare the crayons by removing the paper and breaking them into smaller pieces if desired.
- Layer the crayons on wax paper in leaf shapes, arranging different colors.
- Melt the crayons by folding the wax paper over them and pressing with a warm iron.
- Cool down the melted crayon design before peeling it off carefully.
- Cut out leaf shapes using scissors or templates.
- Assemble the garland by attaching the leaves to string or twine.
Notes
Use medium heat for ironing and supervise kids during the melting process for safety.