


Vibrant Monster Pencil Holder Made from a Tin Can
Crafting a vibrant monster pencil holder from a tin can is a fun and creative way to organize your workspace. This DIY project not only adds a playful touch to your desk but also helps recycle materials that would otherwise be discarded. You’ll enjoy making this colorful pencil holder as it encourages creativity and allows kids to express their artistic skills. You may also find Colorful Rainbow Monster Pencil Holders Diy useful.
In this tutorial, I will guide you through each step, ensuring you can create a delightful holder that can brighten up any classroom or study area. Let’s dive into this exciting project and make something special together! You may also find Rainbow Monster Pencil Holders Diy Craft For Kids useful.
Why You’ll Enjoy This Project
- Recycling Fun: This project is perfect for reusing tin cans, giving them a new purpose.
- Creative Expression: Personalize your pencil holder by choosing your favorite colors and designs.
- Family Activity: It’s a great craft to do with kids, allowing family bonding while being productive.
- Functional Decor: This pencil holder is not only decorative but also practical for keeping your workspace tidy.
- Easy to Customize: Adjust the design to fit any room’s theme or for seasonal decorations.

You may also find Desk Organizer Kids Rainbow Monster Pencil Cup Garden Theme useful.
Materials You’ll Need
- Empty tin can (cleaned and label removed)
- Acrylic paint or colored markers
- Paintbrushes (if using paint)
- Googly eyes
- Glue (craft or hot glue)
- Colorful paper or craft foam
- Scissors
- Optional: glitter, stickers, or any additional decorations
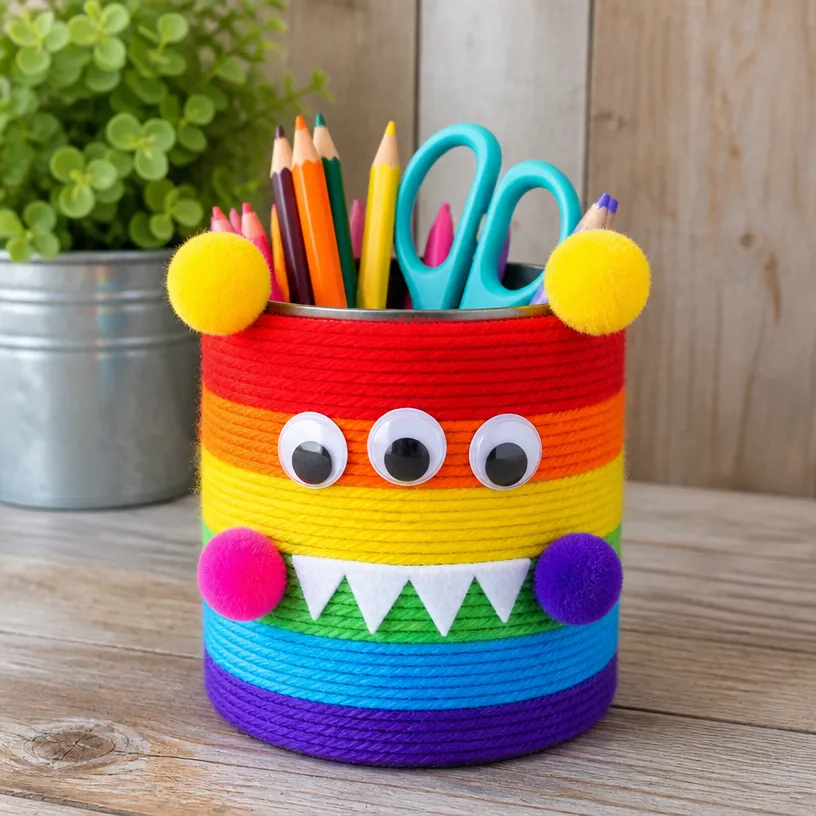
How to Make Vibrant Monster Pencil Holder Made from a Tin Can
Prepare the Tin Can: Start by removing any labels from the can. Clean it thoroughly and allow it to dry completely. You may also find Diy Rainbow Monster Pencil Caddy Popsicle Sticks useful.
Paint the Base Color: Choose a vibrant color of acrylic paint and use it to paint the outside of the tin can. If you prefer, you can also use colored markers. Allow the paint to dry fully before proceeding.
Cut out Shapes: While the paint is drying, take your colorful paper or craft foam and cut out shapes for the monster’s features, such as teeth, arms, or decorations.
Attach the Features: Once the paint is dry, use glue to attach the googly eyes and the cut-out shapes to the can, creating your monster’s face and features.
Add Final Touches: To enhance your pencil holder’s design, consider adding glitter or other decorations. Let everything dry for a while.
Now your vibrant monster pencil holder is ready to fill with pencils, pens, and other supplies! For additional colorful ideas, check out this colorful monster pencil tin organizer.
Helpful Tips
- Drying Process: Allow ample time for paint and glue to dry completely to avoid any smudges or accidents.
- Easier Assembly: Pre-plan your design to make the assembly process quicker and more straightforward.
- Supervision: If crafting with young children, supervise them, especially when using scissors or hot glue.
- Displaying Your Work: Place your finished pencil holder on a sunny windowsill to showcase your artwork and brighten your space.
Easy Variations
- Seasonal Themes: Change the colors and decorations to match different holidays or seasons.
- Size Variation: Use small cans for a mini holder or larger cans for a more spacious organizer.
- Different Creatures: Instead of monsters, create holders resembling other animals or fun characters.
- Customized Colors: Paint the can in favorite colors or patterns, such as stripes or polka dots.
- Crafty Additions: Attach additional craft materials like pom-poms or feathers for an extra whimsical touch.
Making This Craft With Kids
This craft is an excellent choice for children, as it encourages creativity and fine motor skills. You might want to supervise younger kids during the cutting and gluing stages to ensure they handle supplies safely. They can take full control of the painting and decorating parts, making this craft an enjoyable learning experience.
How to Display or Use It
Once completed, this vibrant monster pencil holder can be displayed on your desk, shelf, or any creative space. It will not only help keep your writing tools organized but also serve as a unique piece of art that reflects your personality. Gift it to a friend or use it to brighten up a classroom or playroom!

Frequently Asked Questions
1. Can I use any type of paint for this project?
Yes, acrylic paint works best, but you can also use markers for a quicker alternative.
2. What if I don’t have googly eyes?
You can draw eyes directly on the can or use buttons or beads as substitutes.
3. How can I clean the tin can before starting?
Simply wash it with soapy water, rinse, and make sure it’s dry before using it for this craft.
4. Can I make multiples?
Absolutely! Making multiple holders can be a great group activity, and they’ll all be unique!
5. What’s the best way to store the holder?
Find a spot at your desk or use it as display decor for a colorful touch to your space.
Conclusion
Creating a vibrant monster pencil holder from a tin can is not only an enjoyable craft but also an environmentally friendly project. For more exciting ideas, check out this monster pencil case. If you’re looking for a practical storage solution, consider this decorative pencil storage box. Happy crafting!
Print
Vibrant Monster Pencil Holder Made from a Tin Can
- Total Time: 45 minutes
- Makes: 1 pencil holder
Description
Craft a vibrant monster pencil holder from a tin can, perfect for organizing your workspace and expressing creativity.
Materials
- Empty tin can (cleaned and label removed)
- Acrylic paint or colored markers
- Paintbrushes (if using paint)
- Googly eyes
- Glue (craft or hot glue)
- Colorful paper or craft foam
- Scissors
- Optional: glitter, stickers, or any additional decorations
Instructions
- Prepare the tin can: Remove any labels and clean thoroughly.
- Paint the base color: Choose and apply acrylic paint or markers to the outside of the can.
- Cut out shapes: Using colorful paper or foam, cut out monster features.
- Attach the features: Glue the googly eyes and cut-out shapes onto the can.
- Add final touches: Consider adding glitter or decorations and let dry.
Notes
For easier assembly, pre-plan your design and supervise children during cutting and gluing.