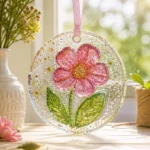
Description
Create a beautiful DIY Clear Glue Suncatcher that captures the essence of nature and brightens your home with colors.
Materials
- Clear glue (such as school or craft glue)
- Wax paper or plastic wrap
- Colored tissue paper or other transparent materials (like cellophane)
- Scissors
- A paintbrush or sponge (optional for spreading glue)
- String or yarn (for hanging)
Instructions
- Prepare your workspace: Lay down a clean surface with wax paper or plastic wrap.
- Cut your materials: Use scissors to cut the colored tissue paper into fun shapes.
- Apply glue: Spread a thin layer of clear glue onto your wax paper.
- Arrange your colors: Place cut tissue pieces onto the glue to create a colorful design.
- Seal the deal: Apply another layer of clear glue over the top to seal the tissue paper.
- Let it dry: Allow the suncatcher to dry completely.
- Cut out the suncatcher: Carefully cut around the shape of your design.
- Add hanging string: Tie a loop at the top with string or yarn.
Notes
Supervise children when using scissors and glue. Create small suncatchers for windows or larger ones for a bigger effect.