Description
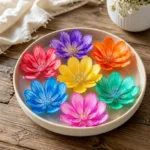
A delightful tutorial on creating stunning blooming paper flowers that brighten any space, perfect for family crafting activities.
Materials
- Colorful paper (construction or scrapbook)
- Scissors
- Glue stick or hot glue gun
- Floral wire or thin sticks (for stems)
- Green paper (for leaves)
- Optional: markers or paints for additional decoration
Instructions
- Prepare the Petals: Choose your colored paper. Cut out petal shapes using scissors. Aim for about six to eight petals per flower.
- Shape the Petals: Gently curl or fold the edges using your fingers for a more natural look.
- Assemble the Flower: Apply glue to the base of the first petal and attach it to the center of your floral wire. Continue adding petals around the center until they are all in place.
- Add Leaves: Cut out leaf shapes from green paper and glue them onto the stem.
- Final Touches: Add any additional decorations, such as drawing details on petals or creating a contrasting center.
Notes
Consider using a variety of papers for added interest. Pre-cut shapes for younger children to avoid frustration.