

Colorful Rainbow Salt Blossom on Canvas
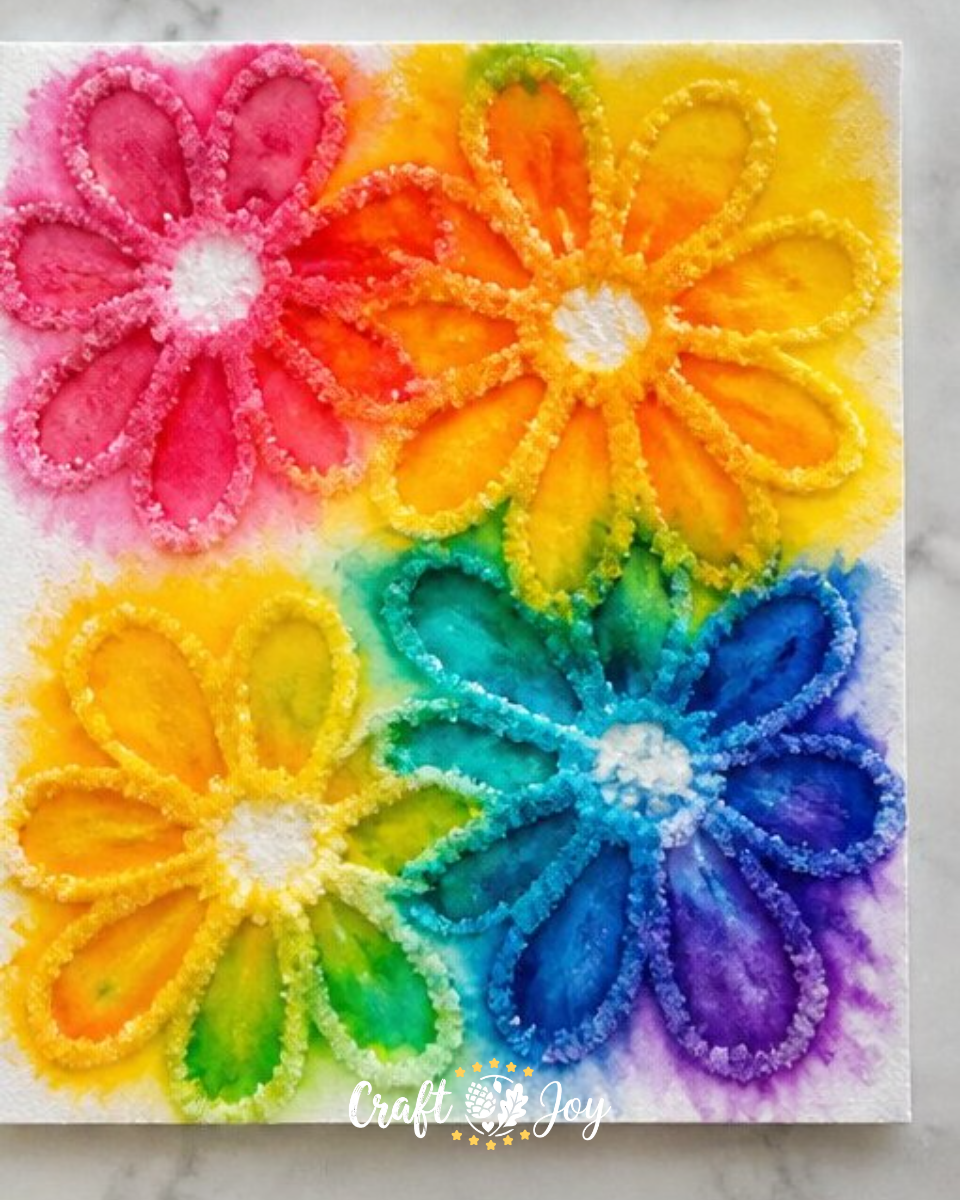
Creating a Colorful Rainbow Salt Blossom on Canvas is a delightful project that combines simple materials with beautiful results. This craft is not only visually stunning but also easy to do, making it a perfect choice for family activities or classroom projects. By utilizing everyday supplies like liquid watercolors and table salt, you can create vibrant blooms that spring to life before your eyes. You may also find Melted Crayon Rainbow Butterfly Suncatcher For Kids useful.
This project is enjoyable because of its hands-on nature and the element of surprise as the colors spread over the salt. Watching the colors mix and bloom is a mesmerizing experience for both kids and adults. If you’re looking for more fun projects like this one, consider making a melted crayon rainbow heart suncatcher.
You may also find Melted Crayon Rainbow Haunted House Suncatcher Craft useful.
Why You’ll Enjoy This Project
Here are some reasons why this project will be a hit: You may also find Pressed Flower Rainbow Window Medallions useful.
- Easy to Set Up: You won’t need a lot of time or complicated supplies.
- Visually Stunning: The colors bloom beautifully on the salt, creating an eye-catching result.
- Creative Freedom: You can experiment with different flower shapes and color combinations.
- Educational: This craft teaches kids about color mixing and basic art techniques.
- Great for All Ages: Whether you’re a beginner or a more experienced crafter, it’s adaptable to any skill level.
Materials You’ll Need
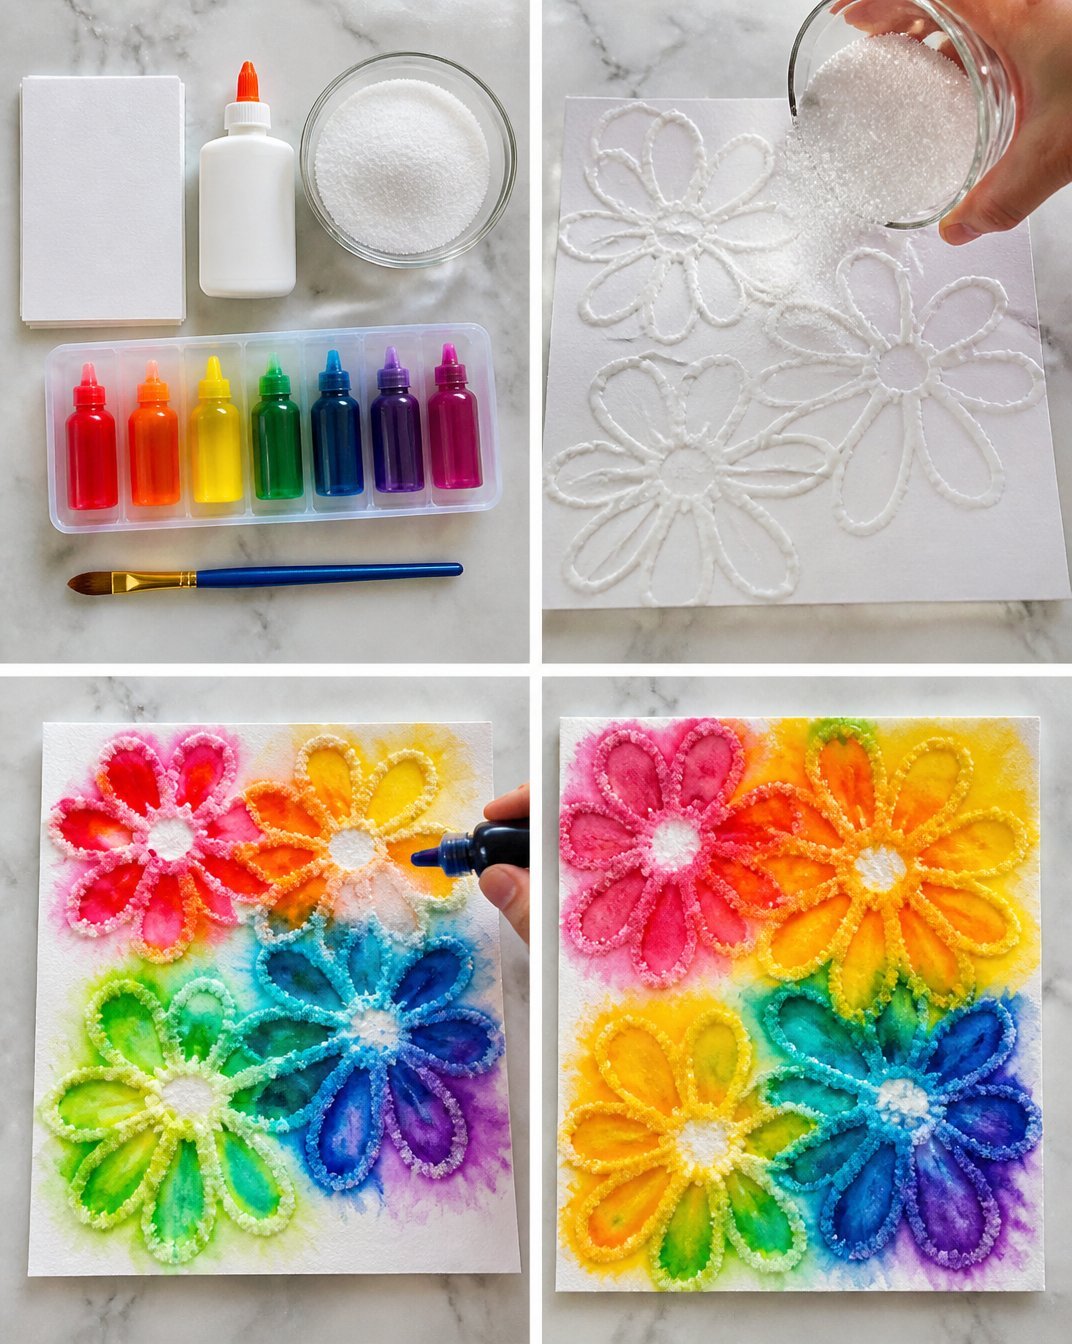
To get started, gather the following materials: You may also find Rainbow Cupcake Liner Monster Wreath Halloween useful.
- Cardstock
- White glue
- Table salt
- Liquid watercolors
- Paintbrush
Make sure your liquid watercolors are vibrant for the best results. If you don’t have liquid watercolors, you could experiment with food coloring or tempera paint, but results may vary.
How to Make Colorful Rainbow Salt Blossom on Canvas
Draw Flowers: Using the white glue, draw large flowers on your cardstock. You can be creative with the shapes and sizes.
Add Salt: Once you’ve drawn your flowers, sprinkle table salt over the glue. Make sure to cover all the glued areas generously.
Remove Excess Salt: Gently lift your cardstock and shake off the excess salt so that only the glued areas remain covered.
Apply Color: Drop your chosen liquid watercolors onto the salt. Watch as the colors spread and bloom across the design. It’s like magic!
Let It Dry: Allow your artwork to dry completely before displaying it.
Helpful Tips
- Use a Light Hand: When applying the watercolors, less is often more. Start slowly to control the blooming effect.
- Experiment with Placement: Consider how light will hit your finished piece; try hanging it in a window for an illuminated effect.
- Keep It Clean: To avoid mess, do this project on a tray or over a surface that can catch salt spills.
- Display Your Art: Once dry, frame your masterpiece or hang it on the wall for a vibrant decoration.
Easy Variations
- Seasonal Designs: Adapt the flower shapes to match the seasons think snowflakes for winter or leaves for fall.
- Mixed Media: Incorporate other materials such as pressed flowers or stickers along with the salt and colors.
- Size Matters: Instead of making one large canvas, create a series of smaller cards that can be grouped together.
- Themed Colors: Use colors that fit a particular theme, like holiday colors or your favorite colors.
Making This Craft With Kids
This project is a fantastic way for kids to explore their creativity! Adults can help by drawing the initial glue flowers or guiding them in how to apply the salt and colors. Supervise the younger ones to prevent too much mess and to ensure they use the liquid watercolors safely.
How to Display or Use It
After your Colorful Rainbow Salt Blossom dries, think about where to display it. You can frame it as wall art, use it as a colorful greeting card, or even hang it in your window to catch the sunlight.
Frequently Asked Questions
1. What type of glue works best for this project?
White school glue is ideal as it dries clear and helps the salt stick well.
2. Can I use these techniques on other surfaces?
Yes, you can experiment with different papers or even canvas for a different texture!
3. How do I store leftover materials?
Keep your liquid watercolors in a cool, dry place and close any containers tightly to prevent drying out.
4. Is this project messy?
Some mess is likely, especially with salt and paint, so be sure to work in an area that is easy to clean.
5. Can I add other embellishments after it dries?
Absolutely! Feel free to add stickers, glitter, or other decorations once your salt blossoms are complete.
Conclusion
Creating your Colorful Rainbow Salt Blossom on Canvas is a delightful way to explore art with simple materials. If you’re interested in expanding your crafting palette, check out how you can create magical backgrounds for your art by adding salt to ink for even more creative fun. Additionally, consider making a rainbow DIY tote bag that combines functionality with your love for vibrant colors. Happy crafting!
Print
Colorful Rainbow Salt Blossom on Canvas
- Total Time: 10 minutes
- Makes: 1 canvas
Description
A delightful craft project creating vibrant flowers using salt and liquid watercolors, perfect for family activities or classrooms.
Materials
- Cardstock
- White glue
- Table salt
- Liquid watercolors
- Paintbrush
Instructions
- Draw flowers using the white glue on cardstock.
- Add salt by sprinkling it over the glue.
- Remove excess salt by shaking off the cardstock.
- Apply liquid watercolors onto the salt.
- Let it dry completely before displaying.
Notes
Use a light hand when applying watercolors to control the blooming effect. Experiment with placements for the best light effects.