


DIY Magnetic Organizer Using an Upcycled Tea Tin
Creating your own magnetic organizer using an upcycled tea tin is a fun and practical way to bring some order to your workspace. Not only do you give new life to a tin that might otherwise end up in the trash, but you also create a useful item that helps keep your small tools and stationery organized. This project is enjoyable and contributes to a tidy environment, making it a perfect craft for families looking to engage in simple and eco-friendly activities together. You may also find Coffee Filter Ghost Garland Diy Halloween Decor useful.
You’ll find this DIY magnetic organizer to be a delightful addition to your home or office. It takes minimal materials and effort, providing a sense of accomplishment as you enjoy the finished product. Let’s dive into why this project is worth trying! You may also find Diy Botanical Butterfly Ornament Pressed Flowers useful.
Why You’ll Enjoy This Project
- Eco-Friendly: By upcycling a tea tin, you help reduce waste while being creative.
- Customizable: You can easily personalize your organizer with your favorite colors, patterns, or decorative elements.
- Functional: This magnet organizer keeps important items easily reachable and visible, perfect for any desk or craft space.
- Family-Friendly: Engaging in this project allows for quality time spent crafting with kids or friends.
- Budget-Friendly: The materials are inexpensive or often already available at home, making it a cost-effective solution.

You may also find Diy Enchanted Jar Lanterns Garden Decor useful.
Materials You’ll Need
- An empty tea tin
- Magnetic strips or magnetic buttons
- Strong adhesive or hot glue
- Paint or decorative paper (optional, for customization)
- Scissors
- A utility knife (for adult supervision if children are involved)

How to Make DIY Magnetic Organizer Using an Upcycled Tea Tin
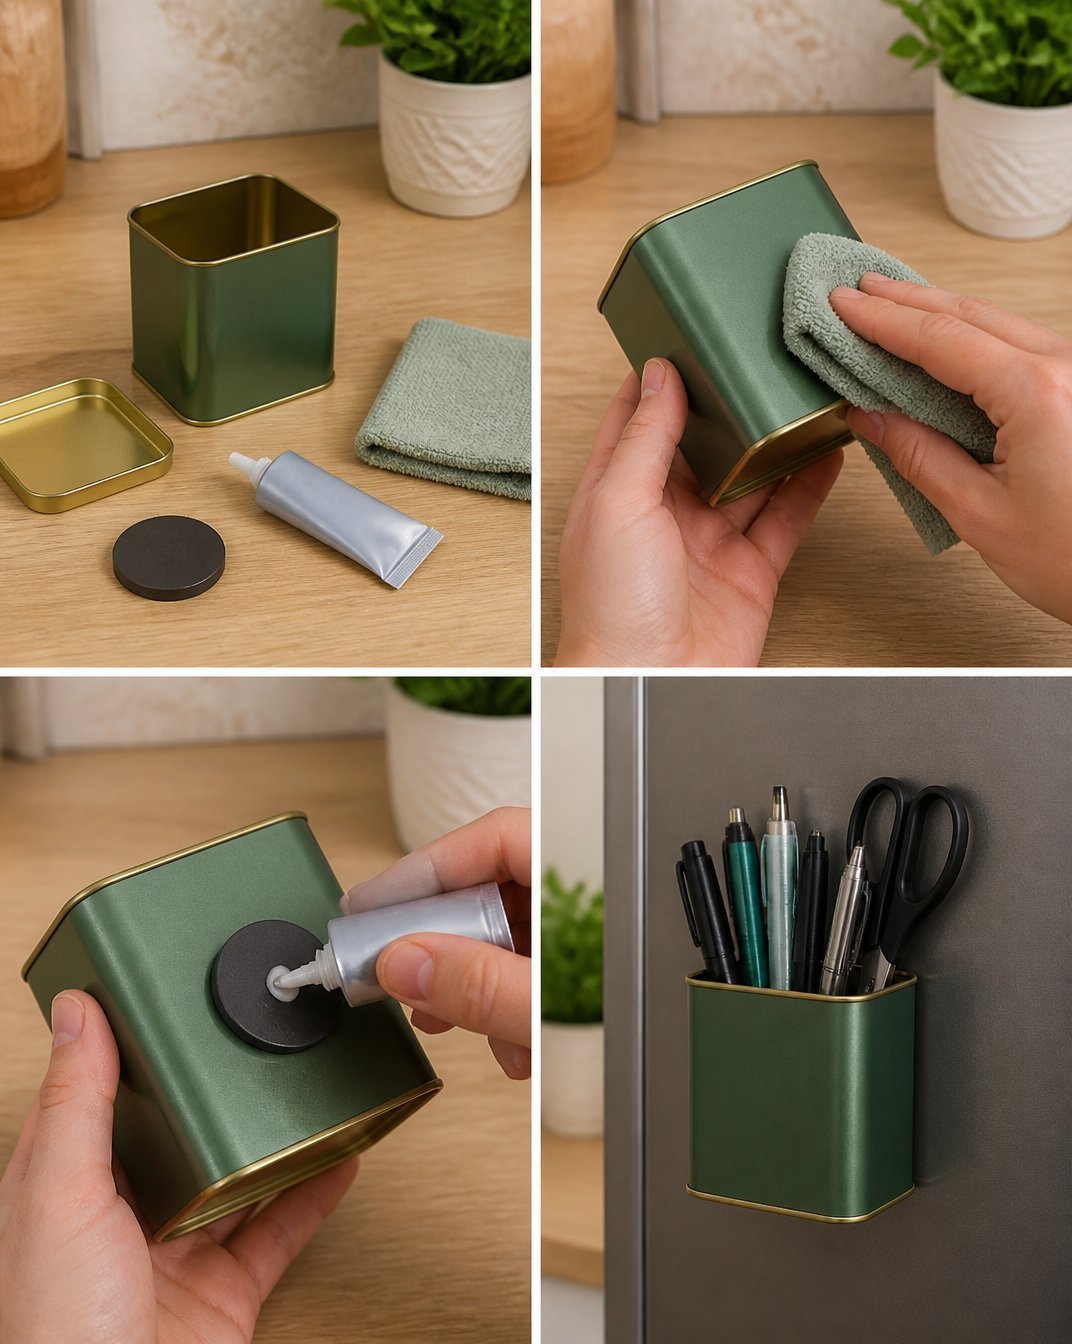
Prepare the Tin: Start with a clean and dry tea tin. Remove any labels if necessary to create a smooth surface for decoration. You may also find Diy Floating Flower Bowl Centerpiece Every Season useful.
Decorate the Tin: If you’d like to personalize your tin, paint it or cover it with decorative paper. Be creative! You might find inspiration from a dried flower lantern project to use floral designs.
Attach the Magnets: Cut the magnetic strips or adhere magnetic buttons to the back of the tin. Make sure they are securely fastened so your organizer holds its contents firmly. Use a strong adhesive or hot glue for best results.
Place Your Organizer: Choose a metal surface where you’d like to hang your organizer, such as a fridge or a metal bulletin board.
Fill Your Organizer: Load the tin with all the small items you want to keep organized, such as paper clips, pens, or other craft supplies.
Helpful Tips
- Easy Assembly: Use a glue gun for a quick bonding process, which helps any decorations stick better.
- Variety of Magnets: If you need more strength, consider using larger or multiple magnets to hold heavier items.
- Placement: Ensure that the surface where you attach the tin is clean. Grit or grime can affect the magnet’s power.
- Supervision: When working with kids, assist them with cutting or using the glue gun for safety.
Easy Variations
- Seasonal Designs: Change the paint or paper decoration seasonally for a fun twist.
- Larger Tins: Use larger tins for more storage; they can hold bigger items like scissors or glue bottles.
- Mixed Media: Combine materials such as twine or ribbons to give a unique texture or aesthetic to your organizer.
- Color Themes: Match your organizer’s colors with your workspace or home decor for a cohesive look.
Making This Craft With Kids
This project is an excellent opportunity for kids to practice their crafting skills. Children can enjoy painting or decorating their tins, but adult supervision is recommended when using scissors or hot glue. Encourage them to share their ideas about what items to store in the organizer.
How to Display or Use It
Once your magnetic organizer is filled and in place, it can serve multiple functionsl; use it in an office to hold office supplies, or set it up in a craft room for easy access to essential tools. It also makes an attractive gift for teachers or friends who appreciate handmade, practical items.
Frequently Asked Questions
Can I use other types of containers?
Yes, any tin that has a magnetic back will work as an organizer!
What if I don’t have magnets?
You can also use adhesive strips or pushpins that fit your setup.
How can I clean the organizer?
Simply wipe the outside with a damp cloth, being careful not to soak the inside.
Can I add more magnets later?
Absolutely! You can add more magnets for extra support if necessary.
What should I store in my organizer?
It can hold anything from craft supplies to office items like pens and sticky notes!
Is this project safe for toddlers?
While decorating is safe, be cautious with glue guns and scissors.
Conclusion
This DIY magnetic organizer using an upcycled tea tin is not only a brilliant way to declutter but also a creative outlet for your personal touch. Upcycling projects like this instill sustainable practices while adding personal flair to your organized spaces. For more inspiration on upcycling, check out these ideas on how to upcycle tea tins into fridge storage magnets and explore a practical guide for a repurposed tea tins office organizer. Happy crafting!
Print
DIY Magnetic Organizer Using an Upcycled Tea Tin
- Total Time: 10 minutes
- Makes: 1 organizer
Description
Create a functional and stylish magnetic organizer using an upcycled tea tin, perfect for managing small items in a creative way.
Materials
- An empty tea tin
- Magnetic strips or magnetic buttons
- Strong adhesive or hot glue
- Paint or decorative paper (optional)
- Scissors
- A utility knife (for adult supervision if children are involved)
Instructions
- Prepare the tin: Start with a clean and dry tea tin and remove any labels.
- Decorate the tin: Paint or cover it with decorative paper for personalization.
- Attach the magnets: Cut magnetic strips or adhere buttons to the back of the tin.
- Place your organizer: Hang it on a metal surface like a fridge or bulletin board.
- Fill your organizer: Load the tin with small items like paper clips, pens, or craft supplies.
Notes
Use a glue gun for quick bonding. Supervise children when using scissors and glue guns.